Building a Wildlife Pond Summer 2025
03/02/2026
A pond for wildlife was what I was after, with the ultimate goal of seeing frogspawn in it and dragonflies gadding about around it. I definitely wasn't looking to stock it with carp, koi or not (if you know that joke), and hoped to be able to avoid the need for a pump.
I'd umm'ed and aah'ed for a year about the location. The easy part was buying a couple of hundred high density breeze blocks. They'd been waiting patiently on the patio, which was where I originally thought it could go. Eventually though, I settled on somewhere at the edge of the garden, near a large compost heap. Good chomping ground for the beasties I hoped would become pond inhabitants. It was on the site of an old, long demolished, shed and near a small spring that's run continuously since we moved in 25 years ago...until this last summer.
The idea had been to dig down a foot or so, and use the dug earth to provide different levels around the pond for various plants. About an inch down, in old money, that idea was found to be not as cunning as all that. The aforementioned shed had been build on a surprisingly solid concrete base. Okaaay, so now the pond was going to be built just up the way. I ran the numbers, and found I had sufficient blocks to make it deep enough to keep the bottom from freezing. A bit over 2' 6”.
In terms of kg/£ (I like to mix my units), breeze blocks are a good deal; cheaper even than mixing your own concrete. Having found the concrete base wasn't level any more (being on the edge of a slope), I did get a man in to mix & place some fresh stuff for the foundations. Lest further slippage might occur, I even put in a few reinforcing bars (rebar to those in the trade), to discourage the foundation from cracking. I couldn't rely on any small boys being on hand with spare fingers to plug gaps should there be a leak.
Having decided I was going to build the wall myself (how hard can it be and all that), I swithered about hiring a cement mixer. I got too impatient and nailed a couple of lengths of wood to the sides of an 8x4 sheet of OSB. A spade impaled itself wantonly in three bags of sharp sand to one of Perkins, or perhaps it was Jewsons, finest cement. My pal ChatGPT assured me sharp sand made for stronger, if slightly less workable, mortar.
As you add a bit more water, it's surprising how fast cement goes from just-about-the-right consistency to a-bit-on-the-runny-side. I'll leave you to insert the rest of the script from the cheese shop sketch. Fortunately I was taking a note of what I was doing, so this only happened once.
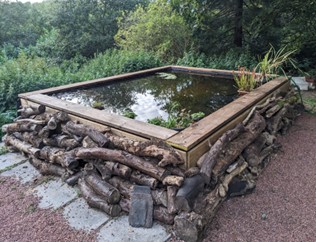
After installing a few layers of blocks, I admired my work, apart from a rather curvy bit which was supposed to be straight, and got a ruler out, only to find the blocks appeared to have grown in height. You may have guessed it. The 'less workable' mortar was about twice as thick as the average brickie would lay it. Time will tell if this was a really bad thing, but it meant I'd have some spare blocks at the end for shelving. After many cups of tea, it ended looking like this (see right). It includes old carpet and underlay, lying on sand and previously discarded stones and stuff, to provide a beach, front left, and the closest I could get to
Mortimer's deep at the far end, also on the left.
Other features, made up as I went along, are the treated wooden battens screwed on to the
wall sides, and the logs laid in front of them. Breeze blocks are really not the prettiest surface to look at, and the logs had already been forming a pile I've since discovered is called a hibernaculum. A painful condition for male humans with a tendency to roll in snow, but a good way to encourage newts, toads and other critters to take up residence.
The sharp-eyed will notice the scaffolding planks placed around the top. I thought of this as I was wondering what kind of stone slabs might look ok. Whatever it was would rest on the butyl liner when it was installed. The planks seemed a reasonable choice. I don't know how long they'll take to rot, but they're meant to live outside, so hopefully a decent number of years.
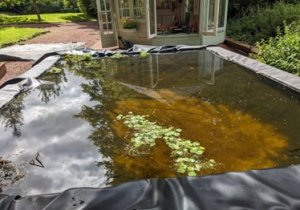
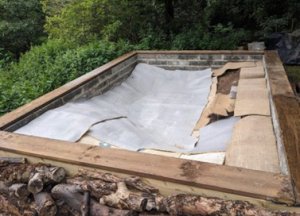
This photo shows the liner installed, and the pond filled. The way the liner lies in a couple of places looks like a dog's breakfast. Given the beach, various slopes and some steep drops under the water, I don't know if someone 'skilled in the art' of pond lining would have got it flatter. By this stage, not keen to pull it all out and start again, I decided to live with it. A strip of 'sacrificial' liner went directly onto the breeze blocks, Then, on three sides, a wooden plank, and finally the liner itself. It was flat enough for the scaffold planks sit on top of it well enough to distribute any load.
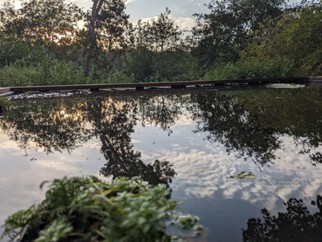
Self tapping concrete bolts hold two of the scaffold planks in place. Drill the holes deep enough to avoid splitting the blocks. The sharp eyed might notice the green hose at the far right of the pond (bottom left photo), which is currently the spring water feed-in. Having a continuous flow seems like a good idea to me, but algae is forming on the bottom of the pond. I'll need to monitor that. The right hand picture below reveals it's an 'infinity' pond. The idea was to limit that outflow water velocity in a downpour. Probably a bit OTT, but an excuse to 3D print some spacers and make the plank a walkway. The pond is under a big sycamore tree. Not ideal in some ways, but I now use a child's pond dipping net to remove excess leaves.

As the summer of '25 wore on, a dragonfly did come to visit. Not a serious buyer, but good to see. I've also seen a snail or two, and loads of mosquito wrigglers. An encouraging start. The plant collection is building. Having already rescued a beetle, and watched in amazement as it folded its wings back in (check it out on YouTube!), I'm looking forward to what 2026 brings.
Search for
Recent Blogs and Case Studies
Categories
- Blogs(22)
- Case Study(11)
- Wildlife Ponds(8)
Archives
- June 2026 (1)
- May 2026 (1)
- April 2026 (1)
- March 2026 (3)
- February 2026 (6)
- January 2026 (3)
- May 2023 (1)
- April 2023 (1)
- March 2023 (1)
- January 2023 (1)
- December 2022 (1)
- November 2022 (1)
- October 2022 (1)
- September 2022 (2)
- August 2022 (4)
- July 2022 (1)
- May 2022 (1)
- March 2022 (3)